3D trouble
4 posters


Re: 3D trouble
![]() by zsolt Thu May 24, 2018 9:16 pm
by zsolt Thu May 24, 2018 9:16 pm
Hi ,Admin wrote:Hi again,
It is a pity that the pencil is not retracting. Clever printing the pencil holder :-)
Question: do you have any pressure on the pencil, so that lifting the pencil by a millimetre has no effect? I.e. the pencil is lifted, but the pressure on it overcomes the lift distance.
Just a thought.
BR Harry
the adjusting of the pencil(later cd marker) is important indeed, first i wanted to see the Z - motor to retract .... in Cura software it did not because i don't really master that program and my settings are poor. On the previous drawing below it did retract . I just changed software
Mostly my problems now are related to the computer i use .
I will return here when i have something usable to post about the soft . Very soon i will be drawing/milling boards i believe. I would even try to use the printer to drill the 1mm holes for the components and i already have a small but fast motor to attach .... and probably the need to get a welder and some iron to rebuild the printer
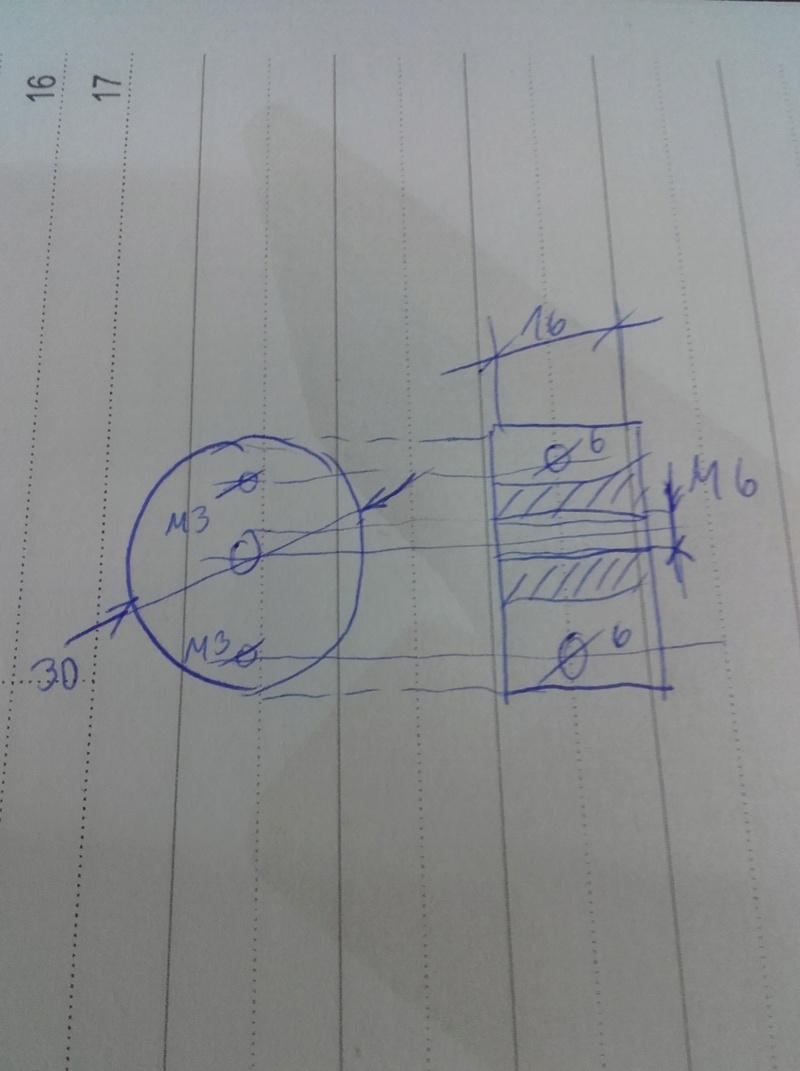
 The thing is that i already made the support of the melting unit heavy by attaching the extruder motor on it (originally the motor was near the printer and the mechanism was pushing the filament through a plastic tube towards the melting unit . Maybe this is an improvement that worth to post, i will ad a picture ) Actually, now my bowden mechanism with motor and everything is one structure with the cold&hot end (i call "melting unit"). I do have 2 twin motors on the Z axis but still ...
zsolt- Posts : 209
Join date : 2017-12-19
Re: 3D trouble
![]() by admin Thu May 24, 2018 6:29 pm
by admin Thu May 24, 2018 6:29 pm
Hi again,
It is a pity that the pencil is not retracting. Clever printing the pencil holder :-)
Question: do you have any pressure on the pencil, so that lifting the pencil by a millimetre has no effect? I.e. the pencil is lifted, but the pressure on it overcomes the lift distance.
Just a thought.
BR Harry
It is a pity that the pencil is not retracting. Clever printing the pencil holder :-)
Question: do you have any pressure on the pencil, so that lifting the pencil by a millimetre has no effect? I.e. the pencil is lifted, but the pressure on it overcomes the lift distance.
Just a thought.
BR Harry
_________________
Everything in this world is either bacon, or it isn't bacon
They say that money cannot bring you happiness, but if you have it then you can always buy more bacon

admin- Admin
- Posts : 1144
Join date : 2012-11-24
Age : 72
Location : Märsta, Sweden -


Re: 3D trouble
![]() by zsolt Mon May 21, 2018 1:45 pm
by zsolt Mon May 21, 2018 1:45 pm
Hi,
I actually managed to draw 2D from a Jpeg... the pencil was shaking so i printed a "pencil holder"

https://www.tinkercad.com/things/fDM1FXxCXSc-i3penholder2/editv2
So ... it improved a little my drawing .
This is still not usable for PCB drawing . I made the drawing in paint, saved it in jpg format .Opened that in CURA 2.3.1 . Then printed the result with Repetier. Something i'm still not doing right , because you can see the lines between letters with retraction enabled (set at 1.5mm) . The pencil was not retracting at all.

I actually managed to draw 2D from a Jpeg... the pencil was shaking so i printed a "pencil holder"
https://www.tinkercad.com/things/fDM1FXxCXSc-i3penholder2/editv2
So ... it improved a little my drawing .
This is still not usable for PCB drawing . I made the drawing in paint, saved it in jpg format .Opened that in CURA 2.3.1 . Then printed the result with Repetier. Something i'm still not doing right , because you can see the lines between letters with retraction enabled (set at 1.5mm) . The pencil was not retracting at all.
zsolt- Posts : 209
Join date : 2017-12-19
Re: 3D trouble
![]() by admin Thu May 17, 2018 11:39 am
by admin Thu May 17, 2018 11:39 am
Hi again,
It is not easy, but when you have mastered your machine then you really get to know it backwards. You can do anything with it. We can all have different solutions for the same effect, and the correct solution is a solution that works.
For me, I use an extra fan to cool the filament before it enters the nozzle. That way it stays stiff and the extruder motor can push the filament more accurately. I can also use a couple of mm "filament extraction" when the nozzle is moving between objects.
I like your thinking, and that you have got the guts to start drilling and finding your own solutions. A couple of my 3D friends have difficulty modifying their machines.
One tip I found, is to wet the bult plate (with painters tape on it) before applying the Pritt glue. The surface of the glue then has a glossy shine, and the bottom of the models look really neat. While the platform is heating I do just give a last minute fine spray of water to make sure the glue is sticky.
I wonder if one can use double-sided sticky tape? That could also give a good and uniform build surface.
Thanks for the pix. You have explained admirably ;-)
BR Harry
_________________
Everything in this world is either bacon, or it isn't bacon
They say that money cannot bring you happiness, but if you have it then you can always buy more bacon
admin- Admin
- Posts : 1144
Join date : 2012-11-24
Age : 72
Location : Märsta, Sweden -
Re: 3D trouble
![]() by zsolt Wed May 16, 2018 8:22 pm
by zsolt Wed May 16, 2018 8:22 pm
hi ,
solved the melting head problem . Kind of . I had a debate with a colleague about the nozzle and the teflon tube ...
In his theory the tube has to go as much as possible into the nozzle (like all guys suggest in forums ) , for this he drilled the nozzle and managed to introduce the teflon tube to about 0.37 mm from the tip ( almost drilled out the whole nozzle )
)
As you suspect i did the 180 degree opposite, in my way of thinking there has to be a small reservoir with constant amount of melted material before the nozzle...
We tried out our theory and both printers work fine .
He's hot melt head is still of aluminium , don't have drawings because i don't have autocad ...
I did mine out of a piece of bronze . I still have 2 resistors in parallel for heating just that i introduced an extra mosfet tranzistor to handle the current better

(Don't criticize my drawing , i usually draw wiring's not mechanics )
)
This is the main part of my hot end . The plastic tube from the cold part and the entrance of the nozzle just touch each other inside this part (not drawn), but the nozzle has a hole sector , deep about 4 mm and of 1.7 mm diameter . So this little place is a ~ 9 mm^3 reservoir with melted PLA .
Still working on the 2D drawing .... BMP not good . Jpeg is a better start
solved the melting head problem . Kind of . I had a debate with a colleague about the nozzle and the teflon tube ...
In his theory the tube has to go as much as possible into the nozzle (like all guys suggest in forums ) , for this he drilled the nozzle and managed to introduce the teflon tube to about 0.37 mm from the tip ( almost drilled out the whole nozzle
As you suspect i did the 180 degree opposite, in my way of thinking there has to be a small reservoir with constant amount of melted material before the nozzle...
We tried out our theory and both printers work fine .
He's hot melt head is still of aluminium , don't have drawings because i don't have autocad ...
I did mine out of a piece of bronze . I still have 2 resistors in parallel for heating just that i introduced an extra mosfet tranzistor to handle the current better
(Don't criticize my drawing , i usually draw wiring's not mechanics
This is the main part of my hot end . The plastic tube from the cold part and the entrance of the nozzle just touch each other inside this part (not drawn), but the nozzle has a hole sector , deep about 4 mm and of 1.7 mm diameter . So this little place is a ~ 9 mm^3 reservoir with melted PLA .
Still working on the 2D drawing .... BMP not good . Jpeg is a better start
zsolt- Posts : 209
Join date : 2017-12-19
Re: 3D trouble
![]() by zsolt Sat Apr 28, 2018 9:20 pm
by zsolt Sat Apr 28, 2018 9:20 pm
Hi,
i think there is no need to convert the pcb drawing to 3d ... i speculate to use the printer like a CNC machine . It accepts only G-code so i just need a G-code interpreter ... i still not give up . I managed to draw my initial with a pencil attached to the head ...
Oh and i managed to burn out the Atmega2560 cip
zsolt- Posts : 209
Join date : 2017-12-19
Re: 3D trouble
![]() by admin Mon Apr 23, 2018 7:03 pm
by admin Mon Apr 23, 2018 7:03 pm
Hi Zsolt, sorry for the delay responding.
As Ivan pointed out, Paint / Paintbrush use bitmap instead of vector graphics, which means that resizing looses quality, and plotters/3D printer software cannot interpret the files.
BUT ...
I had a lovely shape in a BMP and so I created a vertical plane in 3D-studio-MAX, then painted the surface with a BMP image. I then drew a line around the image, deleted the BMP, then used the lathe function to create a 3D object. This I exported to an STL file for the slicer.
3D-studio-MAX also has an interesting boolian function in that you can create a shape, extrude it to form a shape and then cut out the shape from a big square block.
Rotate the block by 90 degrees.
Take another shape (side-view drawn from BMP) and cut it out from the same block.
Repeat this for other angles, if needed.
Using this method you can create a 3D model from several photos of the same object.
It would be a bit tricky and a lot of work to create a face, but I used this to make a few models of things, like the space shuttle, a spitfire and an indicator lamp-cover for a 1966 (ish = old) Mercedes.
Has this given you any ideas?
BR Harry - SM0VPO
_________________
Everything in this world is either bacon, or it isn't bacon
They say that money cannot bring you happiness, but if you have it then you can always buy more bacon
admin- Admin
- Posts : 1144
Join date : 2012-11-24
Age : 72
Location : Märsta, Sweden -
Re: 3D trouble
![]() by Ivan Thu Apr 19, 2018 2:45 pm
by Ivan Thu Apr 19, 2018 2:45 pm
Hi,
I may be totally mistaken, but I think 3D printers use vectorized images to print continuous layers whenever possible, while the Paint produces bitmaps??
BR from Ivan
I may be totally mistaken, but I think 3D printers use vectorized images to print continuous layers whenever possible, while the Paint produces bitmaps??
BR from Ivan
Ivan- Posts : 792
Join date : 2012-11-25
Age : 64
Location : Praha, Czechia
Re: 3D trouble
![]() by zsolt Wed Apr 18, 2018 9:36 pm
by zsolt Wed Apr 18, 2018 9:36 pm
Hi, i googled around myself and found some things ,
I'm still thinking about a trick , or two ....
I stick to Paint because Harry uses same to make PCBs ( "PC-PAINTBRUSH" in "windoze") , and i like the idea of being free from use of expensive software.
One trick i want to try out is to draw in Paint and somehow ad to that drawing the 3'd dimension (height 'Z') .Then after slicing, tell the printer to print just the first layer ...
Second trick , to draw in Paint and slice it in a slicer program and tell the printer that, this is it's single layer to print .
I 'm not completely shore how , but i will try this out
The complexity of my pcb's is very reduced
zsolt- Posts : 209
Join date : 2017-12-19
Re: 3D trouble
![]() by Glenndk Wed Apr 18, 2018 4:42 pm
by Glenndk Wed Apr 18, 2018 4:42 pm
zsolt wrote:HI,
i managed to bring on a pencil tot the printer. I would try to draw something with it . In the end i would draw PCB s of course .
How do i start this ?
For example if i start with a simple black/white drawing in paint ?
See e.g.:
http://reprap.org/wiki/Category:PenHolderToolheads
Found via:
Categorized wiki-pages:
http://reprap.org/wiki/Category:Categories
-
I think the right place to ask is here:
http://forums.reprap.org/
http://reprap.org/mailman/listinfo/reprap-users
Found via:
http://reprap.org/wiki/Community_portal
-
Wikipedia: About RepRap project:
https://en.wikipedia.org/wiki/RepRap_project
https://en.wikipedia.org/wiki/Category:RepRap_project
Glenndk- Posts : 114
Join date : 2017-01-06
Location : Copenhagen, Denmark -
Re: 3D trouble
![]() by zsolt Wed Apr 18, 2018 7:51 am
by zsolt Wed Apr 18, 2018 7:51 am
HI,
i managed to bring on a pencil to the printer. I would try to draw something with it . In the end i would draw PCB s of course .
How do i start this ?
For example if i start with a simple black/white drawing in paint ?
i managed to bring on a pencil to the printer. I would try to draw something with it . In the end i would draw PCB s of course .
How do i start this ?
For example if i start with a simple black/white drawing in paint ?
Last edited by zsolt on Wed Apr 18, 2018 9:45 pm; edited 1 time in total
zsolt- Posts : 209
Join date : 2017-12-19
Re: 3D trouble
![]() by zsolt Mon Mar 26, 2018 8:36 am
by zsolt Mon Mar 26, 2018 8:36 am
Hi ,
The tube might be a thing .............
The fan is directly connected to the 12V, that was the first modification when i bought the printer kit . So it's on from the moment i switch power on .
Here is the second modification

Added 2 heater resistors . Why did a young papanaso this ? because the fan is always on and cooling so much the whole thing that it took long long time to heat up the melting head to 210 'C (and i don't have much patience, that comes with time ) , so i added the second resistor . This boosted somewhat the PID regulator , i have a little overshoot for about 2 or 3 seconds , but that is absolutely no problem (thous i could retune the PID ....). Onece it catches the set point it keeps it rock steady.
I discovered something :

I mentioned previously that when the "stuck" - ness happened i manually pushed the filament thinking that the motor is lazy . Well , pressure has built up in the melting head and the material flow out where it could , as the picture shows on the top . This could mean that my stupid nozzle gets stuck i believe . Else it would flow out through the nozzle . The question is why this happens ( to meee ? )

This was the virgin nozzle
The tube might be a thing .............
The fan is directly connected to the 12V, that was the first modification when i bought the printer kit . So it's on from the moment i switch power on .
Here is the second modification
Added 2 heater resistors . Why did a young papanaso this ? because the fan is always on and cooling so much the whole thing that it took long long time to heat up the melting head to 210 'C (and i don't have much patience, that comes with time
I discovered something :
I mentioned previously that when the "stuck" - ness happened i manually pushed the filament thinking that the motor is lazy . Well , pressure has built up in the melting head and the material flow out where it could , as the picture shows on the top . This could mean that my stupid nozzle gets stuck i believe . Else it would flow out through the nozzle . The question is why this happens ( to meee
? )This was the virgin nozzle
zsolt- Posts : 209
Join date : 2017-12-19
Re: 3D trouble
![]() by Glenndk Fri Mar 23, 2018 8:19 pm
by Glenndk Fri Mar 23, 2018 8:19 pm
zsolt wrote:Hi,
i recently started using my I3 printer with 1.75mm filament , after 3/4 of the first layer the filament stops coming out from the nozzle , thous the temperature is rock steady at 230'C . After killing the print , cleaning the mess from the heated bed and calming down , i restart the print and after 3/4 of the first layer same thing happens again and again .... and again
Anyone experienced this behavior ?
The bowden tube has to be fully inserted, so the filament is isolated as long as possible - and to make an almost seamless transition to the internal of the heated block. (my first print attempts was with not fully inserted bowden tubes. Result: Pulling the plastic jam out was impossible. I had to heat the heater, to get the jam melted)
And yes - you need a fan to keep the "cold" end cool.
I also have an i3.
I have another problem; my three-color printer head is leaking plastic from between the heat-sinks and the heated cone. After some layers, melted plastic drips from the heated cone. Result after droplets has cooled: The heated cone collides with great speed with the droplets on the layers. Result: X,Y "zero" calibration lost...
Glenndk- Posts : 114
Join date : 2017-01-06
Location : Copenhagen, Denmark -
Re: 3D trouble
![]() by admin Thu Mar 22, 2018 10:39 pm
by admin Thu Mar 22, 2018 10:39 pm
Ok, then I know a lot more, and you seem to have had more experience than I.
One small suggestion, when I borrowed a printer, I found that it printed ok for a short while, then stopped extruding.
The heated block in which the filament was being fed, was also heating the filament BEFORE it entered the nozzle tube. The filament was still pushed, but since it was already soft, it was a bit like pushing floppy spaghetti into a hole in the ceiling.
My solution was to mount a table fan at the side of the complete machine so that the portion of the filament not in the nozzle feeder tube was cooled by air from the fan. It remained stiff and could then be pushed into the nozzle :-)
Your problem sounds EXACTLY like this. If you have a fan on the front of the extruder, then you can switch the fan on in your G-CODE file parameters, or enable it while the extruder is heating.
In your situation the 230ºC will not be helping matters and will be contributing to the pre-melting before entering the extruder.
> I don't know how this "thing" is called in English, it's like a penknife containing several metal blades with different thickness ,one of them is 0.15
This is called a "Feeler gauge". I did a lot of work on old car engines in the 70s. Cylinder head gasket, re-grinding valves, new piston-rings, etc. Torque wrench and feeler-gauge were about the most important items.
> special little tube (PTF or PETF or don't know it's abbreviation, some teflon tube)
PTFE (Polytetrafluoroethelene)
Very best regards from Harry - SM0VPO
_________________
Everything in this world is either bacon, or it isn't bacon
They say that money cannot bring you happiness, but if you have it then you can always buy more bacon
admin- Admin
- Posts : 1144
Join date : 2012-11-24
Age : 72
Location : Märsta, Sweden -
Re: 3D trouble
![]() by zsolt Thu Mar 22, 2018 9:07 pm
by zsolt Thu Mar 22, 2018 9:07 pm
HI,
i have several PLA filaments all 1.75 mm dia , The problem is not filament dependent .
The leveling of the plate is also eliminated because of several checks . Actually i do leveling every single time i start the printer. I use 0.15 mm thing. I don't know how this "thing" is called in English, it's like a penknife containing several metal blades with different thickness ,one of them is 0.15, it's used to adjust spark plugs and valve gaps around an engine .
Because of the high density of doing this operation , i developed a little helper . I connected a red LED between the +12 V of the power supply and the printing head . With a proper series resistor of course . So when the printing head comes down and touches the "thing" ( 0.15 mm blade) , the LED light's up because he gets his ground through the carbonic foil from the bed.
By manual control feature of the Repetier Host i heated the printing head at 230 , raised the head at 10 cm above the bed and activated extruder motor .
Same thing . First the material coming from the nozzle had the diameter of the nozzle 0.25 mm, after 20 ..30 cm of continuous flow the material got thinner and thinner until stop.
By anger and disappointment, i taught that the nozzle is stuck so decided to "burn it out". I disconnected the heating resistor from the control board and i connected it to a 24V source. By this i heated up the head to 300 'C (reducing the voltage back to about 13V) and i manually evaporated about 10 cm of PLA . By manually i say that i actually pushed by hand the PLA in the head. It flew like water , i encountered wery little resistence. After this abuse i was shore that the nozzle is clean and not stuck. So i put everything back and of course at a new print : same thing
By the way i modified a little the head , it has 2 heating resistors in parallel 40W + 40W .
The extruder motor's driver is set to maximum current (and not heating) this was the first thing i set at the printer .
The thing is that when this happens i can't push the filament not even with my hand . I feels stuck .Just that i don't understand where it is stuck . Between the nozzle and the bowden is the aluminium radiator . In the interior there is a special little tube (PTF or PETF or don't know it's abbreviation, some teflon tube) . I belive that there can the filament get stuck . There is the question why is not stuck from the beginning, why it get's stuck after some print ? Or why it gets stuck at all ?
The problem is temperature dependent i believe
Never had problem with the carbonic platform.
I will try out your settings to. Tomorrow i will bring some pictures with the minor modifications i carried out . At a certain point i wanted to add an additional bowden in series, with an other driver board(with same command of course) , but i saw no use when i couldn't push the filament by hand . I would carry out any modification to get rid of this problem forever .
i have several PLA filaments all 1.75 mm dia , The problem is not filament dependent .
The leveling of the plate is also eliminated because of several checks . Actually i do leveling every single time i start the printer. I use 0.15 mm thing. I don't know how this "thing" is called in English, it's like a penknife containing several metal blades with different thickness ,one of them is 0.15, it's used to adjust spark plugs and valve gaps around an engine .
Because of the high density of doing this operation , i developed a little helper . I connected a red LED between the +12 V of the power supply and the printing head . With a proper series resistor of course . So when the printing head comes down and touches the "thing" ( 0.15 mm blade) , the LED light's up because he gets his ground through the carbonic foil from the bed.
By manual control feature of the Repetier Host i heated the printing head at 230 , raised the head at 10 cm above the bed and activated extruder motor .
Same thing . First the material coming from the nozzle had the diameter of the nozzle 0.25 mm, after 20 ..30 cm of continuous flow the material got thinner and thinner until stop.
By anger and disappointment, i taught that the nozzle is stuck so decided to "burn it out". I disconnected the heating resistor from the control board and i connected it to a 24V source. By this i heated up the head to 300 'C (reducing the voltage back to about 13V) and i manually evaporated about 10 cm of PLA . By manually i say that i actually pushed by hand the PLA in the head. It flew like water , i encountered wery little resistence. After this abuse i was shore that the nozzle is clean and not stuck. So i put everything back and of course at a new print : same thing
By the way i modified a little the head , it has 2 heating resistors in parallel 40W + 40W .
The extruder motor's driver is set to maximum current (and not heating) this was the first thing i set at the printer .
The thing is that when this happens i can't push the filament not even with my hand . I feels stuck .Just that i don't understand where it is stuck . Between the nozzle and the bowden is the aluminium radiator . In the interior there is a special little tube (PTF or PETF or don't know it's abbreviation, some teflon tube) . I belive that there can the filament get stuck . There is the question why is not stuck from the beginning, why it get's stuck after some print ? Or why it gets stuck at all
The problem is temperature dependent i believe
Never had problem with the carbonic platform.
I will try out your settings to. Tomorrow i will bring some pictures with the minor modifications i carried out . At a certain point i wanted to add an additional bowden in series, with an other driver board(with same command of course) , but i saw no use when i couldn't push the filament by hand . I would carry out any modification to get rid of this problem forever .
zsolt- Posts : 209
Join date : 2017-12-19
Re: 3D trouble
![]() by admin Thu Mar 22, 2018 7:05 pm
by admin Thu Mar 22, 2018 7:05 pm
Hi Zsolt,
I also have an i3 printer, but the Wanhao Duplicator version.
Are you using PLA or filament?. If so then 230ºC seems a bit high. I normally run mine at 193ºC to 200ºC. I also run the platform at 60ºC then turn it down to 55ºC after the first two layers. Most PLA filaments seem good at 200ºC but I have found a couple that need a bit less. If you print a vertical screw thread and the threads break up then the nozzle is too hot.
You say it stops in the middle of the first layer? That is very early. It could also be that the printing platform is not exactly level. I had that problem where the nozzle was too close to the platform at one side. The result was that the hole was blocked at that side of the platform. I always level the platform with a 0.1mm gap at all 4 corners, and also in the centre of the platform. If the centre is off then one or more corners are not properly aligned.
Another point, many write that one sheet of photo-copy paper is 0.1mm. NOT the ones I have measured. The 3M paper I use is 0.055 thick, so I align with two layers of paper. If that loosely binds then the nozzle is 0.1mm from the platform.
After the bed is levelled, just try to apply a bit of downward and then upwards pressure, then wiggle it a bit sideways. THEN repeat the bed levelling. I find that there is a little "play" in the adjustments, but that disappears during the first 2 minutes of printing - so wiggling it a little will make it settle before the print starts.
If all else fails then check the stepper motor that feeds the nozzle. Look at the specification data-sheet of the motor and note the current and resistance. You may need to adjust the motor driver to get the correct current. If not then it will work while the motor is cold, but as the motor warms a little it can slow, miss steps, or stop, if the current is on the edge. There is normally an adjustment pot on the driver board that sets the reference voltage. On my board it is something like 2.4 V to give 1.4 Amperes (figures are examples, quoted from an ageing memory).
The printer I borrowed a couple of years ago was set between 1.2A and 1.7A, so the alignment was terrible. As soon as I corrected it, the printer worked perfectly. My Wanhao was assembled in from parts, and I had to do the initial adjustments from scratch.
Tip: if the reference voltage test-point is also the wiper of the pot, then you can put a tube-insulated instrument screwdriver through the adjustment hole, and monitor the voltage on the screwdriver.
Ok, so there are a few hints from my limited experience. I would prioritize them:
1 - Temperature (200/60)
2 - Levelling
3 - Extruder motor current
4 - Shitty filament
I threw away one roll of black filament. Never had a decent print - would not stick to the bed, even with a layer of glue, would not stick to the previous layer, heads kept clogging. Blue and yellow from the same manufacturer is perfect. If you have not wasted much then manufacturers will accept returns of crappy filament and give you a credit note or replacement filament.
BR Harry - SM0VPO
Last edited by Admin on Thu Mar 22, 2018 7:11 pm; edited 2 times in total (Reason for editing : Just wondering why the language filter allowed shitty and crappy? Perhaps it is a crappy filter? (or have I forgotten to add those words?))
_________________
Everything in this world is either bacon, or it isn't bacon
They say that money cannot bring you happiness, but if you have it then you can always buy more bacon
admin- Admin
- Posts : 1144
Join date : 2012-11-24
Age : 72
Location : Märsta, Sweden -
3D trouble
![]() by zsolt Wed Mar 21, 2018 6:38 pm
by zsolt Wed Mar 21, 2018 6:38 pm
Hi,
i recently started using my I3 printer with 1.75mm filament , after 3/4 of the first layer the filament stops coming out from the nozzle , thous the temperature is rock steady at 230'C . After killing the print , cleaning the mess from the heated bed and calming down , i restart the print and after 3/4 of the first layer same thing happens again and again .... and again
Anyone experienced this behavior ? . How can this be explained ? i'm going nuts about this . The nozzle can't be stuck because it would not start working again after restart . Also the head temperature is not falling , i checked with a thermocouple . The aluminium before the melting head is continuously ventilated by a cooler , it's not getting warmer then normal , i can comfortably hold may hand on it .
It's not the bowden motor also . When the material sops coming out from the nozzle i see the bowden mechanism trying to push the filament further , but it can't because the filament behaves like stuck in the melting head . So the gear pushing the filament starts rolling over (so the motor has power enough )
zsolt- Posts : 209
Join date : 2017-12-19
Permissions in this forum:
You can reply to topics in this forum|
|
|